Monday 12 December 2016

JUnit based on Spring MVC Test framework fails with AuthenticationCredentialsNotFoundException


After adding the second servlet and a servlet mapping to the web.xml configuration of a Spring-based web application, a JUnit test that relied on the Spring MVC Test framework started to fail.
The unit test was used to verify proper functioning of controller security layer that is based on Spring Security framework (v3.2.9 at the time).

The JUnit code (fragments):

@ContextConfiguration(loader = WebContextLoader.class, locations = {
"classpath:spring/application-context.xml",
"classpath:spring/servlet-context.xml",
"classpath:spring/application-security.xml"})
public class AuthenticationIntegrationTest extends AbstractTransactionalJUnit4SpringContextTests {
    @Autowired
    private WebApplicationContext restApplicationContext;

    @Autowired
    private FilterChainProxy springSecurityFilterChain;    

    private MockMvc mockMvc;

...

    @Before
    public void setUp() {
        mockMvc = MockMvcBuilders.webAppContextSetup(restApplicationContext)
                .addFilter(springSecurityFilterChain, "/*")
                .build();
    }

    @Test
    public void testCorrectUsernamePassword() throws Exception {
        String username = "vitali@vtesc.ca";
        String password = "password";
       
        ResultActions actions = mockMvc.perform(post("/user/register").header("Authorization", createBasicAuthenticationCredentials(username, password)));
    }
}

The test started to fail with the AuthenticationCredentialsNotFoundException as the root cause.
The change that caused the failure was introduced in order to split request security filtering into 2 distinct filter chains. The existing configuration for securing RESTful calls with Basic authentication needed to be amended to add a separate handling of requests supporting the Web user interface of the application.
That necessitated adding a second <security:http> configuration to the application-security.xml context:

<!-- REST -->
<http pattern="/rest/**" entry-point-ref="basicAuthEntryPoint" authentication-manager-ref="restAuthManager">
...
</http>

<!-- Web UI -->
<http pattern="/web/**" entry-point-ref="preAuthEntryPoint" authentication-manager-ref="webAuthManager">
        <custom-filter position="PRE_AUTH_FILTER" ref="preAuthFilter" />
        <!-- Must be disabled in order for the webAccessDeniedHandler be invoked by Spring Security -->
        <anonymous enabled="false"/>
        <access-denied-handler ref="webAccessDeniedHandler"/>
</http>

The pattern="/rest/**"  attribute was also introduced at the same time to the original <http> configuration element.

That is what ultimately caused the test to fail since the JUnit was not using Servlet path.
It is important to note that Spring MVC Test Framework runs outside of a web container and has neither dependency nor is using the web.xml.
When testing with MockMvc, it is not required to specify the context path or Servlet path when submitting requests to the controllers under test.
For example, when testing this controller:

    @RequestMapping(value = "/user/register", method = RequestMethod.POST, headers = "accept=application/json,text/*", produces = "application/json")
    @PreAuthorize("hasPermission(null, 'ROLE_USER')")
    @ResponseBody
    public RegistrationResponse register(@RequestBody(required=false) UserDeviceLog userDeviceLog) {
...
it would be sufficient to send request only specifying the mapping:
mockMvc.perform(post("/user/register").header("Authorization", createBasicAuthenticationCredentials(username, password)))

However, when access to the controllers is protected by Spring Security and the pattern is specified in the <security:http> configuration, the Spring MVC Test Framework will fully respect the processing flow failing requests that do not provide a correct Servlet path.

Resolution:
1. Specify a correct Servlet path in the request URL and also add the mapping by passing the path to the servletPath(String) method of the MockHttpServletRequestBuilder class:

mockMvc.perform(post("/rest/user/register").servletPath("/rest").header("Authorization", createBasicAuthenticationCredentials(username, password)));

2. Configure the MockMvc instance with the security filter mapping that matches the pattern specified in the application-security.xml configuration:
    @Before
    public void setUp() {
        mockMvc = MockMvcBuilders.webAppContextSetup(restApplicationContext)
                .addFilter(springSecurityFilterChain, "/rest/*")
                .build();
    }

<end>

Wednesday 13 April 2016

Various tips on Oracle Spatial

When creating a spatial index on a table with SDO_GEOMETRY, one of the required parameters is LAYER_GTYPE.

How to find GTYPE of SDO_GEOMETRY objects in a table:

select sdo_geometry.get_gtype(geom), count(*) from map_data.zip_geom group by sdo_geometry.get_gtype(geom)
/

Monday 11 April 2016

Configuring log4j to create a new log file at each Java program run.

For running standalone Java programs, such as jobs, that use Apache log4j logging, it is often useful to have a separate log file per each program execution.
The post covers a simple approach that can be used with a FileAppender by using a timestamp as part of the log file name injected from a system property.

Two different samples are provided. One can be used when the Java program is launched directly from a shell (manually or via a scheduler) and the other when launching it as an Ant task.

The log4j configuration is the same for both scenarios and is shown right below:

# A sample Log4j configuration demonstrating how to create a new log file 
# at each program start.
# Created:  Apr 6, 2016 by Vitali Tchalov

log4j.rootLogger=info, stdout, logfile

log4j.appender.stdout=org.apache.log4j.ConsoleAppender
log4j.appender.stdout.layout= org.apache.log4j.PatternLayout
log4j.appender.stdout.layout.ConversionPattern= %5p [%t] (%d) %c - %m%n

log4j.appender.logfile=org.apache.log4j.FileAppender
log4j.appender.logfile.File=logs/job_${log.timestamp}.log
log4j.appender.logfile.layout=org.apache.log4j.PatternLayout
log4j.appender.logfile.layout.ConversionPattern=%d [%t] %5p %c - %m%n

The configuration uses a custom system property log.timestamp to append a unique (with a second precision) suffix to the log file name.

The way the property is set depends on how the Java program is launched.

Scenario 1 - when starting a plain regular Java program by directly invoking the java executable

1. Add a system property in a static block of the main class (i.e. the launching class with the main(String[]) method) prior to referencing any Logger.

static {
    System.setProperty("log.timestamp", 
        new  SimpleDateFormat("yyyyMMdd_HHmmss").format(new Date()));
}

Below is a complete class source code:

package com.forms2docx;

import java.text.SimpleDateFormat;
import java.util.Date;

import org.apache.log4j.Logger;

/**
 * A sample class to demonstrate a technique to configure Log4j to create a new log file at each program run.
 * 
 * To compile the sample program, specify the absolute path to a log4j.jar file, for example:
 * javac -d bin -cp ".;./lib/log4j-1.2.17.jar;" ./com/forms2docx/*.java
 *
 * To run with the static block that programmatically adds the log.timestamp property:
 * java -cp ".;./bin;./lib/log4j-1.2.17.jar;" com.forms2docx.Log4jNewFile
 *
 * To run with the log.timestamp property passed from the command line:
 * java -cp ".;./bin;./lib/log4j-1.2.17.jar;" -Dlog.timestamp=$(date +"%Y%m%d_%H%M%S") com.forms2docx.Log4jNewFile
 *
 * @author Vitali Tchalov
 */
public class Log4jNewFile {
    static {
       System.setProperty("log.timestamp", 
           new  SimpleDateFormat("yyyyMMdd_HHmmss").format(new Date()));
    }

    private static final Logger logger = Logger.getLogger(Log4jNewFile.class);

    public static void main(String[] args) {

        logger.info(String.format("Job has started at %s.", 
            new SimpleDateFormat("yyyy-MM-dd HH:mm:ss").format(new Date())));

        logger.info("The sample demonstrates how to configure Log4j to create a new file on every program run.");
 
    } 
}


To execute this program, compile and run from a shell:

java -cp ".;./bin;./lib/log4j-1.2.17.jar;" com.forms2docx.Log4jNewFile

Of course, a log4j jar file must reside on the classpath.

If modifying the source is not possible or desirable for whatever reason, it is also possible to supply the system property on the command line, like this:

java -cp ".;./bin;./lib/log4j-1.2.17.jar;" -Dlog.timestamp=$(date +"%Y%m%d_%H%M%S") com.forms2docx.Log4jNewFile

The command line above is for a UNIX system (e.g. Linux, Mac). It might be possible to adapt it for Windows too but formatting a date and time to a short format would be very cumbersome in Windows.

Scenario 2 - starting a Java program (job) as an Ant task.

These steps are required for launching a Java program as an Ant task:

1. Include <tstamp /> to the Ant build file
2. Add the following to the java task:
<sysproperty key="log.timestamp" value="${DSTAMP}_${TSTAMP}" />

Note, the DSTAMP and TSTAMP are standard variables defined by Ant.

An example of an Ant build file to launch a Java program as an Ant task: (requires a log4j.jar file on the classpath as well as Ant in the PATH):
<project name="Launch Java Ant task sample" basedir="." default="info">
    <echo message="Launching Java Ant task sample..." />

    <tstamp/>

    <target name="info">
     <echo message="The runJob Java task demonstrates creating a new log file at each run."/>
    </target>

    <target name="runJob" description="Demonstrates a new log file per each run.">
        <java 
                classname="com.forms2docx.Log4jNewFile"
                fork="true"
                failonerror="true">
            <jvmarg value='-Dlog4j.configuration=file:"${basedir}/log4j.properties"' />
            <jvmarg value='-server' />
            <sysproperty key="log.timestamp" value="${DSTAMP}_${TSTAMP}" />

            <classpath>
                <pathelement location="${basedir}/bin"/>
                <fileset dir="${basedir}/lib">
                    <include name="*.jar" />
                </fileset>
            </classpath>
        </java>

        <echo message="Task completed."/>          
    </target>
</project>
 
Note that by default, the TSTAMP is in "HHmm" format. When this precision is not sufficient, then a custom property with a required format can be added.
For example:
    <tstamp>
        <format property="tstamp-sec" pattern="HHmmss"/>
    </tstamp>


Then the sysproperty in the java task would look like this:

<sysproperty key="log.timestamp" value="${DSTAMP}_${tstamp-sec}" />
 
/* --- end --- */

Sunday 31 January 2016

How to enable iOS app for iCloud Documents

1. a) New app: create a new App ID in Member Center on Apple Developer website (https://developer.apple.com/). The account must have Agent or Admin role.

- open Certificates, Identifiers & Profiles, select Identifiers


- click the + sign to create a new App ID.
- App ID Description: enter a Name, for example - iCloudDriveExplorer
- App ID Prefix: it defaults to the Team ID and is not editable
- App ID Suffix: select the Explicit App ID option - it is a must for using iCloud. Example: net.samples.iCloudDriverExplorer
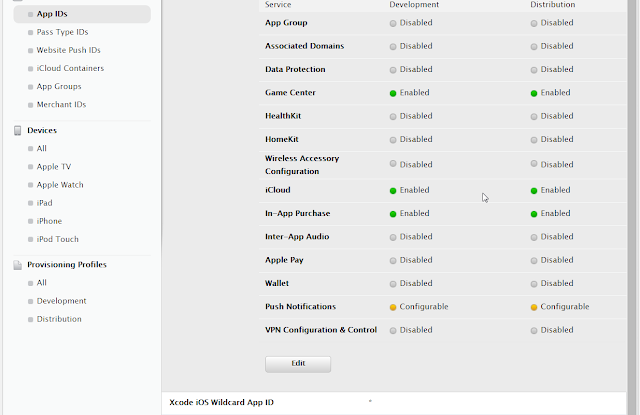
- App Services: check the iCloud option and select either Compatible with Xcode 5 or Include CloudKit support (requires Xcode 6), whichever suits the needs. Note: the status initially will be set to Configurable with a yellow indicator - that is OK.


- click Continue and complete the App ID creation process.

1. b) Existing app: Edit the App ID
- check the iCloud box option and select either Compatible with Xcode 5 or Include CloudKit support (requires Xcode 6), whichever suits the needs. Note: the status initially will be set to Configurable with a yellow indicator - that is OK.

2. In Xcode - create a new project or configure an existing project to enable iCloud Document entitlement.
- select the project's target and open the Capabilities tab.


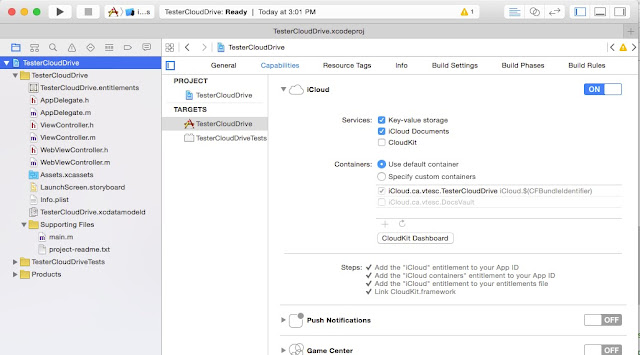
- expand the iCloud row and switch the iCloud ON. Xcode will create the project entitlement plist file, in this example named: iCloudDriveExplorer.entitlements

The contents of the project entitlements file will look similar to this:

<plist version="1.0">
<dict>
    <key>com.apple.developer.icloud-container-identifiers</key>
    <array/>
    <key>com.apple.developer.ubiquity-kvstore-identifier</key>
    <string>$(TeamIdentifierPrefix)$(CFBundleIdentifier)</string>
</dict>
</plist>

- check required iCloud services: Key-value storage, iCloud Documents and CloudKit, whatever is needed.


When enabling iCloud Documents, Xcode will offer to use either the default container or custom containers. Configuring custom containers is a subject for another post.
For the default container Xcode will add a container entitlement to the project entitlments file and will update the Provisioning Profile. After this step, the status indicator for iCloud in the Member Center will become green:


After Xcode adds containers to the project entitlement file, it will be similar to this:

<plist version="1.0">
<dict>
    <key>com.apple.developer.icloud-container-identifiers</key>
    <array>
        <string>iCloud.$(CFBundleIdentifier)</string>
    </array>
    <key>com.apple.developer.icloud-services</key>
    <array>
        <string>CloudDocuments</string>
    </array>
    <key>com.apple.developer.ubiquity-container-identifiers</key>
    <array>
        <string>iCloud.$(CFBundleIdentifier)</string>
    </array>
    <key>com.apple.developer.ubiquity-kvstore-identifier</key>
    <string>$(TeamIdentifierPrefix)$(CFBundleIdentifier)</string>
</dict>
</plist>

Important:
Enabling iCloud for an app requires an Xcode Developer Account with Agent or Admin role.
Even though Xcode allows to have multiple Developer Accounts (Xcode > Preferences > Accounts) and prompts to choose the account with which to enable iCloud, it may fail to create a container entitlement:
Add the "iCloud containers" entitlement to your App ID.

In this case Xcode will offer the Fix it option. However, running the Fix will not prompt for the Developer Account and may fail if the account Xcode choses to run with does not have Agent or Admin role.
One workaround is to remove, temporarily, other accounts from Xcode and only leave the Admin (or Agent) account. The other accounts can be exported into a file (Xcode > Preferences > Accounts > select Apple ID then click the Setting icon on the bottom left  > Export Developer Accounts).
When iCloud configuration complete, these accounts can be easily imported back.

Update:
In later versions of Xcode, for example 7.2, it is also possible to create and enable iCloud entitlements entirely from within Xcode. As long as the Developer Account has Agent or Admin role, Xcode will create App ID automatically. It will also modify the Provisioning Profile to enable iCloud service when the iCloud capability is switched on. And it will create entitlements for the default iCloud container. Manually creating App ID and enabling it for iCloud via Member Center is no longer the only option.


Friday 17 October 2014

RestKit install - RKValueTransformers file not found


Adding the RestKit framework to an Xcode project manually, i.e. without using CocoaPods, results in project build errors similar to these:

Compile RKEntityMapping.m
'RKValueTransformers.h' file not found
  In file included from /.../RestKit-0.23.3/Code/CoreData/RKEntityMapping.m:21
  In file included from /.../RestKit-0.23.3/Code/CoreData/RKEntityMapping.h:22

Compile RKManagedObjectImporter.m
'RKValueTransformers.h' file not found
  In file included from /.../RestKit-0.23.3/Code/CoreData/RKManagedObjectImporter.m:26
0.23.3/Code/CoreData/RKMapperOperation.h:22

Up to and including version 0.20.3, adding the RestKit framework downloaded as a source zip file from GitHub required a few simple steps (todo: link) and worked easily on several projects.

Following the same procedure to add version 0.23.3 resulted in the errors shown above. 

Both files, i.e. RKValueTransformers.h and RKValueTransformers.m, are still referenced from the RestKit.xcodeproj but are not bundled into the zipped source.

It turns out that beginning with version 0.22.0, these 2 files were extracted from RestKit project into its own project on GitHub: https://github.com/RestKit/RKValueTransformers
The project needs to be downloaded separately (i.e. when not using CocoaPods for installation).
The two files can be simply copied into this directory under the RestKit:

RestKit-0.23.3/Vendor/RKValueTransformers

Unfortunately, that does not solve the whole problem. Apparently, packaging of the source code was changed and no longer includes dependencies such as AFNetworking, SOCKit and others.
So, if you persist in your stubbornness (as does this author) and still prefer to integrate RestKit into your project without CocoaPods, you're facing a very daunting option: download all dependencies manually and add them to the sub-directories inside the RestKit-0.23.3/Vendor.

Luckily, there is a faster way (only takes few minutes): the trick is to use CocoaPods to bring all dependencies into a helper project and then simply copy files into the target .

  • create a new simple project in Xcode. The template does not matter, Single View Application is fine. Project name just for example: RestKitPodsInstall
  • install CocoaPods (if the Mac does not have the package already):
    sudo gem install cocoapods
  • cd into the project directory, i.e. the directory that contains the Xcode project file (e.g. RestKitPodInstall.xcodeproj)
  • create a Podfile:
vi Podfile

platform :ios, '5.0'
pod 'RestKit', '~> 0.23.3'

(change the version to the latest available or whatever is needed)

  • install RestKit into the helper project by running:
pod --verbose install

It should finish with something like this:

Integrating client project

[!] From now on use `RestKitPodInstall.xcworkspace`.

Integrating target `Pods` (`RestKitPodInstall.xcodeproj` project)
  • copy, one by one, content of sub-directories in the Pods directory of the helper project to the target project. Keep in mind that the RestKit source already has placeholder directories for dependencies under the Vendor subfolder. The example below assumes that a manually downloaded RestKit-0.23.3 source code was placed under the Library directory in the target project named Algonquin. The current directory is the project directory of the helper project. (Also note the / at the end of the copied source directory)
mac:RestKitPodInstall vit$ cp -R Pods/AFNetworking/ /Users/vit/iOS-Projects/Algonquin/Algonquin/Library/RestKit-0.23.3/Vendor/AFNetworking

mac:RestKitPodInstall vit$ cp -R Pods/ISO8601DateFormatterValueTransformer/ /Users/vit/iOS-Projects/Algonquin/Algonquin/Library/RestKit-0.23.3/Vendor/ISO8601DateFormatterValueTransformer

mac:RestKitPodInstall vit$ cp -R Pods/RKValueTransformers/ /Users/vit/iOS-Projects/Algonquin/Algonquin/Library/RestKit-0.23.3/Vendor/RKValueTransformers

mac:RestKitPodInstall vit$ cp -R Pods/SOCKit/ /Users/vit/iOS-Projects/Algonquin/Algonquin/Library/RestKit-0.23.3/Vendor/SOCKit

mac:RestKitPodInstall vit$ cp -R Pods/TransitionKit/ /Users/vit/iOS-Projects/Algonquin/Algonquin/Library/RestKit-0.23.3/Vendor/TransitionKit

After all copying is done, the target project should have the structure similar to this:

Algonquin (it's the target project)
| Algonquin
| | main.m
| | VTAppDelegate.h
| | (other source files)
| | Library
| | | RestKit-0.23.3
| | | | RestKit.xcodeproj
| | | | Code
| | | | Resources
| | | | (other files)
| | | | Vendor
| | | | | AFNetworking
| | | | | | AFNetworking
| | | | | | | AFHTTPClient.h
| | | | | | | AFHTTPClient.m
| | | | | | | (other source files)
| | | | | | LICENCE
| | | | | | README.md
| | | | | RKValueTransformers
| | | | | | Code
| | | | | | | RKValueTransformers.h
| | | | | | | RKValueTransformers.m
| | | | | | LICENSE
| | | | | | README.md
| | | | | (rest of dependencies)
| | | (other libraries)
| Algonquin.xcodeproj
| AlgonquinTests


The target project should not be opened in Xcode during this procedure. When the copying complete, open the target project in Xcode. The project should compile without failures (assuming of course that RestKit was already previously configured and that is just a replacement to a newer version).

Friday 22 August 2014

Ehcache CacheManager with same name already exists in the same VM

keys: Java, Ehcache, CacheManager name, multiple configurations

Straight to the point:

Explicitly providing a CacheManager name in an Ehcache configuration file allows to avoid the "CacheManager with same name already exists in the same VM" error after upgrading to Ehcache version 2.5 and later.
The CacheManager name should be specified in each Ehcache config file via the name attribute of the top-level ehcache element, for example:

ehcache.xml
<ehcache name="http-filter-cache"
    xmlns:xsi="http://www.w3.org/2001/XMLSchema-instance" xsi:noNamespaceSchemaLocation="ehcahce.xsd">
    <defaultCache />
</ehcache>
This works regardless whether a singleton or multiple instances of CacheManager are created.

In detail:

Ehcache is a widely used open-source caching solution for enterprise Java applications.
Most known examples, perhaps arguably, would be using Ehcache as a second-level Hibernate cache and the cache implementation in Apache Camel.
Version 2.5 was enhanced with a new feature called Automatic Resource Control. The ARC (finally) allowed to specify heap and disk allocations in bytes rather than in elements (as well as for Off Heap storage).

Problem:
After upgrading a Java web application to take advantage of the new version, we encountered a problem that manifested in failures of numerous JUnit tests. Launching the web application also started to fail.

Examining log files revealed the following error message:

CacheManager with same name already exists in the same VM. Please provide unique names for each CacheManager in the config or do one of following:

1. Use one of the CacheManager.create() static factory methods to reuse same CacheManager with same name or create one if necessary
2. Shutdown the earlier cacheManager before creating new one with same name.

The application included 2 Ehcache configuration files each containing a default cache definition as well as several other named caches. At first, a suspicion was that the problems were caused by having more than one default cache (each file contains a default cache definition). Since the default caches are unnamed, there might have been a collision. That's however proved to be a totally wrong lead.

Proceeding to examine the source code of net.sf.ehcache.CacheManager class, we came across this javadoc comment in class constructors:

Since 2.5, every newly created CacheManager is registered with its name (uses a default name if unnamed), and trying to create multiple CacheManager with same names (or multiple unnamed CacheManagers) is not allowed and throws an exception.

Looking further into the source code and stepping in with the debugger, we discovered that CacheManager now maintains a static Map<String, CacheManager> class variable to store every instance of the class created in the JVM using the name specified in a configuration as the key (the map is named CACHE_MANAGERS_MAP as of version ehcache-core 2.6.9).

All constructors and the factory methods utilize the map to return a CacheManager object according to the specs. The CacheManager provides two kinds of instantiation modes: creating a new instance on each call or returning an existing object (singleton). (More on CacheManager creation modes can be found on a Ehcache website).

Regardless of the creation mode, i.e. instance or singleton, the CacheManager name must be unique.

Surprisingly, considering that the change is quite well documented, the Ehcache documentation does not spell out, at least not readily, how to assign a name to a CacheManager instance.
The answer was found in the ehcache.xsd schema that specifies the optional name attribute for the ehcache element:
<xs:schema>
    <xs:element name="ehcache">
        <xs:complexType>
            <xs:attribute name="name" use="optional"/>
            <xs:sequence>
                <xs:element maxOccurs="1" minOccurs="0" ref="diskStore"/>
                ...
            </xs:sequence>
            ...
When the name attribute is specified for the the top-level ehcache element, a CacheManager constructor will use its value as the name for the CacheManger instance and as the key when registering the object in the static CACHE_MANAGERS_MAP map. Otherwise, i.e. when the name attribute is omitted, CacheManager will use a default value, __DEFAULT__, as the name. If the app is designed to use a single ehcache configuration, it will not cause any trouble. However, there are cases when it's preferable to use multiple cache configuration files. In which case it will result in the error when the name attribute is not used.

To avoid the problem, each Ehcache configuration should specify a name. The fragment from a configuration file below is an example:
<ehcache name="http-filter-cache" xmlns:xsi="http://www.w3.org/2001/XMLSchema-instance" xsi:noNamespaceSchemaLocaton="ehcache.xsd">
   <!-- CacheManager configuration
       (omitted from the sample)
   />
</ehcache>
And in conclusion, a friendly suggestion to the Ehcache development team: maybe the name attribute should be made mandatory rather than optional to avoid the problem described in this post.

Tuesday 5 August 2014

Spring Framework Annotation-based Configuration

With seemingly en masse transition of Java Spring framework users to annotation-based configuration, it sometimes can be quite frustrating to find yourself in a corner when a context configuration easily achievable with XML, can not be realized via annotations.
These are 2 examples:

  • configuring multiple service instances of the same class (not the prototype scope kind of multiplicity).
  • auto wiring of a service implementation based on a configuration parameter.
The first case:

Suppose there is a need to have 2 service beans of the same service implementation. (Of course, to have sense, the bean instances need to be distinct, for example by setting their instance variables to different values).
With an XML config, that can be easily achieved by declaring 2 beans with different ID values, for example:
<bean class=“DocumentServiceImpl” id=“documentService”/>
<bean class=“DocumentServiceImpl” id=“loggingDocumentService”>
    <property name=“shouldLogRequests” value=“true”/>
</bean>

Then, these beans can be configured for injection either in XML via the ref parameter:

<bean class=“DocumentServiceController”>
    <property name=“documentService” ref=“documentService”/>
    <property name=“loggingDocumentService” ref=“loggingDocumentService”/>
</bean>

Or alternatively, even autowiring like this:

public class DocumentServiceController {
 @Autowired
 @Qualifier("baseDocumentService")
 private DocumentService baseDocumentService;

 @Autowired
 @Qualifier("loggingDocumentService")
 private DocumentService loggingDocumentService;
}

The same simply cannot be done via type-level annotations (or, at least not as easily).
This is an annotation based configuration similar to the XML above:
@Service
public class BaseDocumentService implements DocumentService {
}

However, since the @Service annotation takes only a single String parameter, there is simply no way to instantiate a second bean of the same class assigning it a different name or id.

Even though this seems to be a conscious design choice of Spring framework architects (see below; note, the emphasis is the author's), it still can be maddeningly frustrating while looking for a solution.

From a Spring doc at 4.11.3 Fine-tuning annotation-based autowiring with qualifiers
For a fallback match, the bean name is considered as a default qualifier value. This means that the bean may be defined with an id "main" instead of the nested qualifier element, leading to the same matching result. However, note that while this can be used to refer to specific beans by name, @Autowired is fundamentally about type-driven injection with optional semantic qualifiers. This means that qualifier values, even when using the bean name fallback, always have narrowing semantics within the set of type matches; they do not semantically express a reference to a unique bean id. Good qualifier values would be "main" or "EMEA" or "persistent", expressing characteristics of a specific component - independent from the bean id (which may be auto-generated in case of an anonymous bean definition like the one above).

So, to comply with this design, the following approach should be used to achieve the goal of having multiple service bean instances of the same class:

  • Create a new implementation that extends the base service class.
  • Define a post construct method in this new class that sets parameters that would make a second instance to be different.

@Service(“loggingDocumentService”)
public class LoggingDocumentService extends DocumentServiceImpl {
   @PostConstruct
   public void postConstruct() {
       super.setShouldLogRequests(true);
   }
}

Okey, that is not too high price for switching to annotations-based configuration. It actually may promote a better object design, i.e. using subclassing to extend the behaviour of a class rather than using an instance variable and if-else statements for controlling its logic (though it’s not always possible).

Let’s now look at the second scenario.
Under this scenario, there are two different implementations of the same interface (see example below).
Suppose there is also a controller that should be configured via an environment property to use a particular service implementation. For instance, setting an environment configuration property, say document.service.caching.enabled=true, should result in Spring injecting the service implementation that provides document caching capabilities.

public class BaseDocumentService implements DocumentService {
}
public class CachingDocumentService extends BaseDocumentService {
}

public class DocumentServiceController {
    private DocumentService documentService;
}

When using XML configuration, this can be easily achieved by, by way of illustration, using a SpEL expression:

<bean class="BaseDocumentService" id="baseDocumentService" />
<bean class="CachingDocumentService" id="cachingDocumentService" />
<bean class="DocumentServiceController" id="documentServiceController">
    <property name="documentService" ref="#{'${document.service.caching.enabled}'=='yes' ? 'cachingDocumentService' : 'baseDocumentService'}" />
</bean>

With annotations-based Spring configuration, we would need to annotate an instance variable in the controller using the @Qualifier annotation:

@Controller
public class DocumentServiceController {
    @Autowired
    @Qualifier("documentService")
    private DocumentService documentService;
}

Had the @Qualifier annotation accepted property placeholders, that would be the end of the story.
Unfortunately, Spring architects decided not to resolve placeholders in the @Qualifier. Neither there is support for SpEL expressions.
Good news is that it's still possible to solve this task, bad news is that the solution is quite verbose.

First, we would need to implement a FactoryBean<T> interface:

@Component("documentServiceFactory")
@DependsOn({"baseDocumentService", "cachingDocumentService"})
public class DocumentServiceFactory implements FactoryBean<DocumentService> {
    @Autowired
    @Value("${document.service.caching.enabled}")
    private boolean enableDocumentCaching;

    @Autowired
    @Qualifier("baseDocumentService")
    private DocumentService baseDocumentService;

    @Autowired
    @Qualifier("cachingDocumentService")
    private DocumentService cachingDocumentService;

    @Override
    public DocumentService getObject() throws Exception {
        return enableDocumentCaching ? cachingDocumentService : baseDocumentService;
    }

    @Override
    public Class<?> getObjectType() {
        return DocumentService.class;
    } 
}

Second, the qualifier on the service reference in the controller needs to specify the factory bean rather than a service bean. Note though, the type of the reference remains of the service interface (i.e. not of the factory):

@Controller
public class DocumentServiceController {
    @Autowired
    @Qualifier("documentServiceFactory")
    private DocumentService documentService;
}

A drawback of this solution is that at runtime there still going to be 2 beans in the memory while only one will be served by the factory to the controller. However, considering that service bean implementations should not take up too much memory since they need to be thread-safe (i.e. limited number of instance variables), that drawback should not represent a tangible problem.
And forerunning a potential question: Why would it be desired to have an annotation-only Spring configuration? True, typically in medium and large applications it's not practical. But in small programs, like a job or utility, the program becomes tidy when everything is configured through annotations. The other main usage  is for JUnit tests. It's impractical to bring up the whole context of a large application for running a JUnit, so instead of creating a myriad of test-specific contexts, it's much productive to have JUnits fully configurable via annotations.